How to Choose Magnetic Parts Trays for Small Home Repairs
A magnetic parts tray earns its space when screws, nuts, and other compatible steel hardware would otherwise roll off a small work surface. For most furniture assembly and low-risk household tasks, start with one shallow tray whose footprint fits beside the project. Choose a longer or divided tray only when the parts and sequence genuinely need it.
As an Amazon Associate, The Good Home Doc may earn from qualifying purchases.
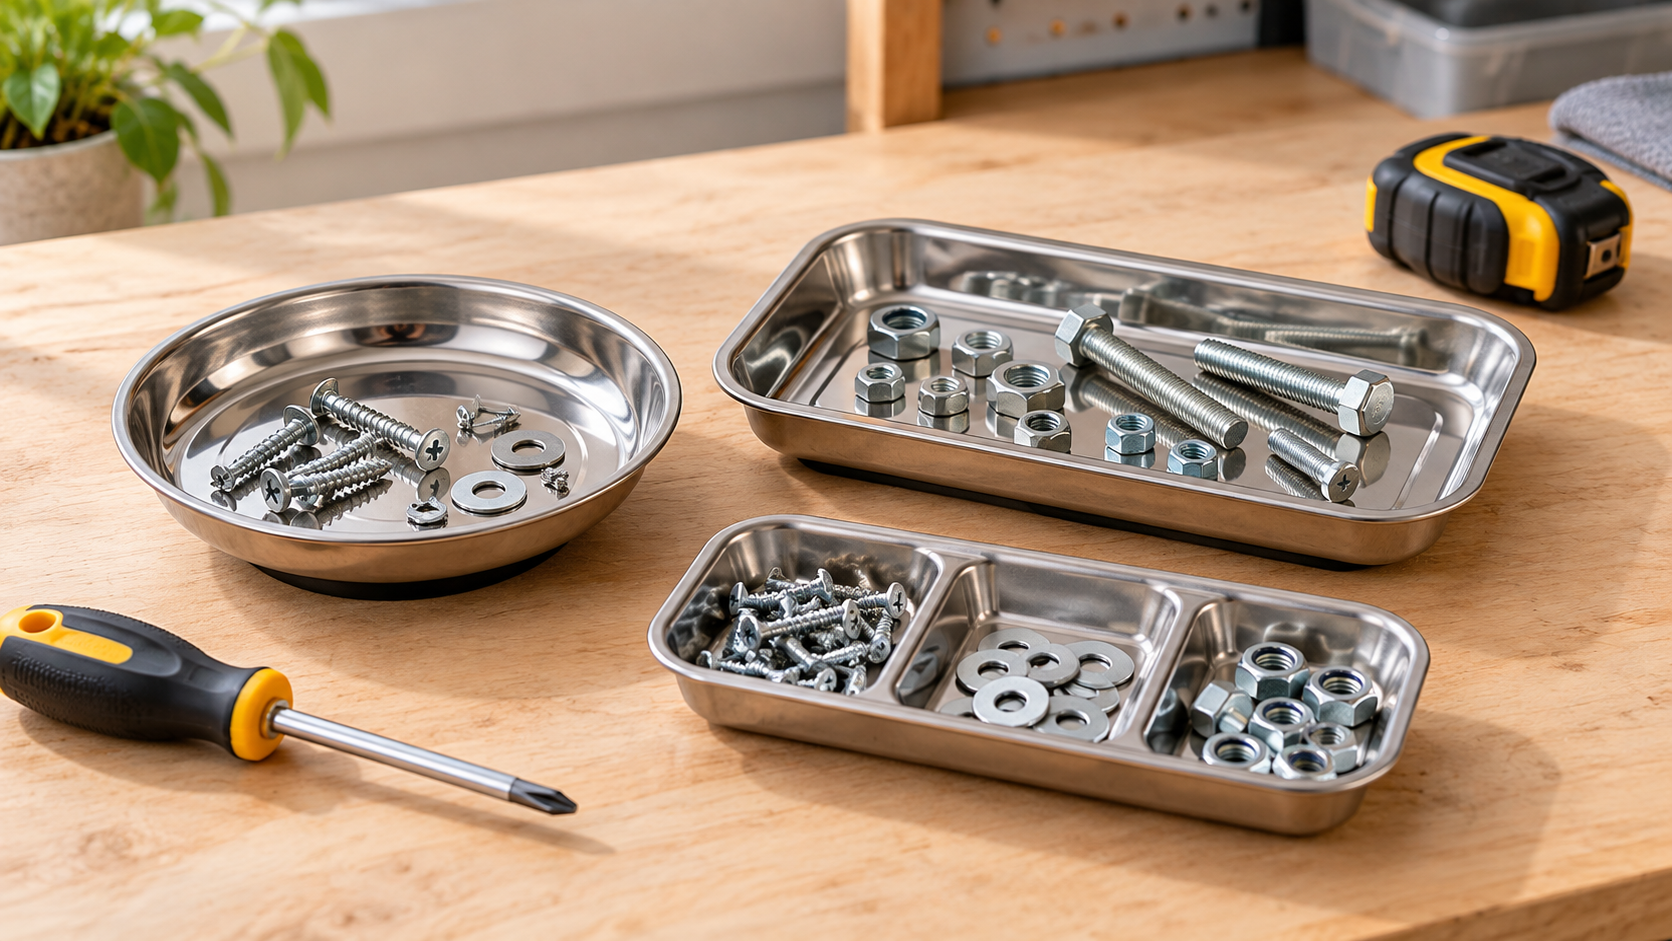
Quick decision before shopping
First measure the available space, identify the setup or surface constraints, and decide who will maintain the item. Skip the category if it blocks access, conflicts with the manufacturer's instructions or lease, or adds more upkeep than the problem justifies.
Choose the tray around the hardware and available work area: These category routes are comparison starting points, not tested winners.
- Browse category: Compare compact magnetic parts traysCheck the complete diameter, depth, magnet position, base covering, care instructions, and maker warnings.
- Browse category: Compare rectangular magnetic parts traysUseful for longer fasteners or grouped rows when the full footprint fits beside the task.
- Browse category: Compare divided magnetic parts traysCheck whether each compartment is large enough for the actual hardware and easy to empty by hand.
Confirm current dimensions, materials, magnet placement, compatible hardware, base covering, nesting claims, cleaning directions, storage instructions, and all magnet warnings on the exact listing. Keep magnets away from anything its manufacturer identifies as magnet-sensitive.
Quick comparison
| Format | Best fit | Main tradeoff | Skip when |
|---|---|---|---|
| Small round tray | One group of screws or washers in a tight work zone | Compact and easy to scan; little sorting space | Several similar parts must stay separate |
| Rectangular tray | Longer fasteners or a row of removed hardware | More usable length; larger bench footprint | It crowds the tool and assembly area |
| Divided tray | Multiple hardware groups or assembly stages | Built-in separation; corners take longer to empty and clean | The compartments are too small for your fingers or parts |
Start with the parts, not the magnet
List what the tray needs to hold and measure the longest piece. Many common steel screws, washers, nuts, and bolts may respond to a magnet, but stainless alloys, brass, aluminum, plastic anchors, wood pieces, and other hardware may not. Test an unimportant sample carefully or use a plain divided container when compatibility is uncertain. Never depend on magnetism as the only containment for mixed parts.
Count the groups that must remain distinct. One shallow bowl is usually clearer than a compartment set for a small furniture assembly. A divided tray is more useful when left and right hardware, different lengths, or disassembly stages must not mingle. If the job includes labeled packets, keep the labels with the parts rather than trusting memory.
Measure the work zone and storage spot
Measure the clear surface beside the task after accounting for the tool, instructions, lighting, and the movement of doors or furniture pieces. A tray that fits the table but forces your hand over sharp hardware or into the assembly path is too large. The tray should remain fully supported on a stable, level surface.
Then measure the drawer, shelf, or tool bag where the clean tray will live. If a set claims to nest, compare the nested dimensions and check whether rubberized bases or protruding magnets interfere. Do not assume several listed diameters collapse into the footprint of the largest tray.
Base covering and surface protection
The magnet is often beneath the tray, where a rubber or polymer cover may separate it from the work surface. Verify that the cover is complete, attached, cleanable, and approved for the intended contact. A covered base can still trap grit, transfer material, or mark a delicate finish. It is not proof that a tray is scratch-free on every surface.
Use the tray only on a surface permitted by both the tray maker and the surface-care guidance. Lift it straight up instead of sliding it. Avoid finished furniture, appliance panels, electronics, and any surface where a mark would be costly. A washable work mat or plain plastic parts box may be the safer format for delicate countertops and floors.
Magnet placement changes how the tray behaves
Some trays use one central magnet; others use multiple magnets or a magnetic base across a larger area. The arrangement can affect how hardware gathers, how firmly the tray contacts a compatible steel surface, and how easily it releases. Compare the maker's description rather than inferring strength from tray size or weight.
This guide treats the tray as a horizontal parts container. Do not attach it overhead, to a wall, vehicle, appliance, ladder, moving object, or vertical surface unless the exact product instructions explicitly permit that orientation and use. A tray that feels secure while empty may behave differently when loaded or bumped.
Visibility and retrieval matter
A shallow, bright metal interior makes dark fasteners easier to see, but reflections can be distracting under direct task lighting. Check rim height and corner shape. A deeper rim improves containment when the table is nudged, while a very deep or narrow compartment can make tiny washers hard to retrieve.
Choose enough open finger space to remove one part without spilling the rest. Do not reach blindly into a tray containing sharp screws, drill bits, blades, damaged hardware, or metal fragments. Magnetic trays are not appropriate storage for loose sharps.
Cleaning and long-term storage
Empty and count the hardware before cleaning. Fine metal debris can cling near the magnet and scratch the next surface, so inspect the underside and rim as well as the bowl. Follow the manufacturer's cleaning and drying directions; do not soak a tray or base unless the instructions allow it.
Store the clean, dry tray away from children and pets. Keep it separated from cards, keys, electronics, tools with sensitive components, and medical devices according to the warnings for those items and the tray. If anyone in the household uses a medical device that may be affected by magnets, follow the device manufacturer's distance and handling guidance and ask a qualified clinician or the manufacturer when uncertain.
Rental and repair limits
A parts tray can organize hardware during permitted furniture assembly, battery-cover removal, or another low-risk task, but it does not make a building repair suitable for DIY. Renters should check the lease and contact the landlord or property manager before altering walls, doors, fixtures, appliances, or building systems.
Stop and use qualified help for electrical, plumbing, gas, structural, fire-safety, mold, pest, code-related, concealed, or unfamiliar work. Do not remove fasteners from equipment or building components merely because the tray can hold them. Keep the appliance or product instructions with the job and return every required part to its documented location.
Who should skip this category?
Skip a magnetic tray when most of the hardware is nonmagnetic, the work surface is delicate or magnet-sensitive, the parts need labels more than magnetic capture, or children and pets cannot be kept away. Skip divided models when their compartments are too small to retrieve parts comfortably. Skip large trays when a lidded organizer or the original labeled packet will contain and preserve the parts more reliably.
A plain light-colored bowl can be better for one short assembly. A lidded divided box is better when parts must travel or remain stored. Small resealable bags with clear labels are often better for a multi-day disassembly where location matters more than instant access.
Buying checklist
- List the hardware materials, lengths, and groups.
- Check whether magnetic capture is useful for those parts.
- Measure the clear horizontal work area.
- Choose round, rectangular, or divided geometry.
- Verify complete dimensions, depth, and finger access.
- Review magnet placement, permitted orientation, and warnings.
- Check the underside covering against the intended surface.
- Measure the clean tray or nested set for storage.
- Plan child-, pet-, electronics-, card-, and device-safe storage.
- Use the tray only for a permitted, low-risk task.
Bottom line
For most small home tasks, one compact round magnetic tray is the simplest useful choice: it contains a single group of compatible steel hardware without consuming the whole work surface. Choose a rectangular tray for longer parts and a divided tray only when separate groups improve the task. Exact dimensions, retrievability, underside protection, storage, and magnet warnings matter more than a claim of extra holding power.
Next step: Put this decision in context with the home comfort and setup guide.